Product will not turn on
If your product appears to be receiving power but won't power on as expected:
Earbuds Will Not Turn On | Bose QuietComfort Ultra Earbuds (2nd Gen)
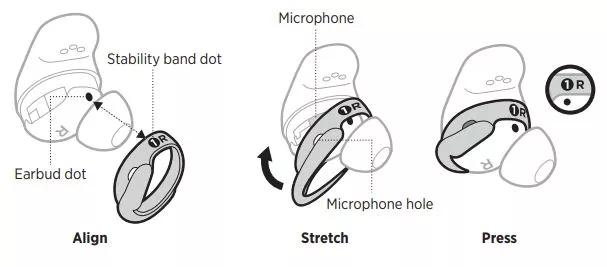
The stability bands on your earbuds may not be properly aligned
Here's How to Fix It:
- Check the alignment: Make sure the numbered dot on the stability band lines up with the dot on the bottom of the earbud.
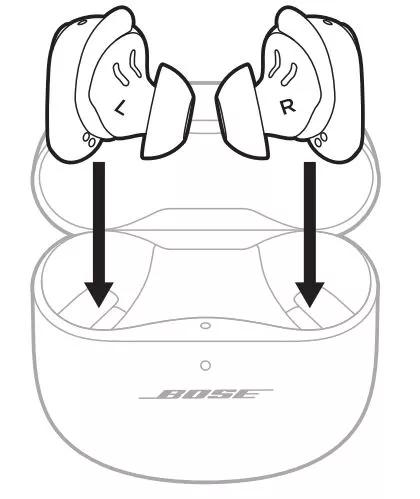
- Listen for the magnetic snap: When aligned correctly, the earbud should "snap" securely into place in the charging case. You'll also see an LED light inside the case lid turn on.
- Try without the stability band: If the earbud still isn't charging, remove the stability band and place the earbud directly in the case. This will help determine if the band is the issue.
Make sure the buds are not in standby mode
The earbuds will enter Standby after 10 minutes of inactivity outside the case. To wake the earbud, simply insert the earbud in your ear.
Resync the earbud connection
- Place both earbuds into the charging case. Keep the lid open. The earbud status light will illuminate when the earbuds are inserted into case. If the status light does not light up, press downward on the buds to ensure they are making a solid connection with the charging pins.
- Close the lid on the case.
- When the status light on the front of the case stops flashing, open the lid, remove just the right earbud, and place it into your right ear.
You should hear the welcome tone. - Place the left earbud in your ear. You should hear the welcome tone and can continue using your product.
If your product has been in extreme hot or cold temperature, wait until it reaches room temperature.
Make sure the earbuds are not in standby mode
Standby conserves the earbud battery when the earbuds are out of the case and not in use. The earbuds switch to standby when you remove both earbuds from your ears for 20 minutes. To wake the earbuds, insert both earbuds in your ears or use the Bose app.
Resetting your earbuds:
Please follow these instructions in the following order:
Resetting Your Bose Earbuds and Charging Case
Resetting the earbuds and charging case resets the product controls and reboots the earbuds and case. It doesn’t clear any device settings. If your earbuds or case aren't responding, follow these steps to reset them:
- Put the earbuds in the case so they snap into place. Make sure the lights show they’re charging.
- Close the lid of the case.
- Plug the case into power using a USB-C cable—either to a wall charger or a computer.
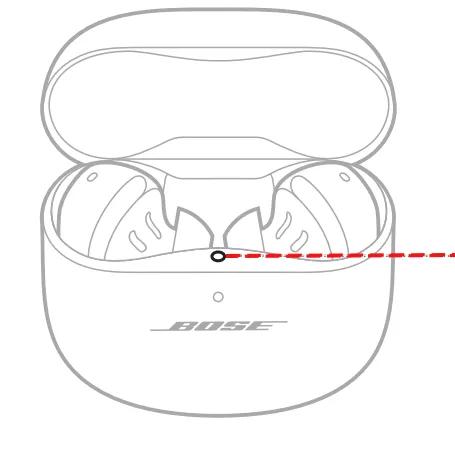
- Press and hold the button on the back of the case for about 30 seconds, until the case light turns off.
That’s it—your earbuds and case are now reset!
Restore Bose Earbuds to Factory Settings
Only do this if you're having issues that the previous reset did not resolve or Bose support asks you to.
This process clears all settings and return the earbuds to their original out-of-box state. After, the earbuds can be configured as if they were being set up for the first time.
- Remove the earbuds from your device’s Bluetooth list.
- Remove the earbuds from your Bose account using the Bose app.
- Put both earbuds in the case and keep the case open.
Press and hold the button on the back for 25 seconds until:- Status light blinks white twice
- Then pulses blue
- Then turns off
- Repeat step 3 two more times.
After the third time:- Status light blinks amber for 3 seconds (reset is starting)
- Then slowly blinks blue (reset complete)
Your earbuds are now restored to their original factory state. Open your Bose App and follow the onscreen instructions to connect your Bose earbuds.
Removing your earbuds from the Bose App:
- Open the Bose app and tap on the "Account" icon in the upper-right corner.
- Select "Manage Products."
- Tap "Edit."
- Select the Bose earbuds.
- Tap "Delete."
- On the following screen, tap "Remove."
- Close the Bose App
Clear out the phone's Bluetooth history:
- Go to your phone's Bluetooth settings menu
- Clear all mentions of the Bose earbuds from the Bluetooth device list, including any duplication with "LE" in the name. Clearing can vary by device. Look for "Clear," "Unpair" or "Forget."
Check that the USB charger meets the power requirement of your product.
On the USB charger, there will be text that indicates the amp (A) or milliamp (mA) rating of the charger. This rating varies among chargers – including those supplied with different models of Bose products. The closer the amp rating of the charger is to the maximum amp rating of the product, the more quickly the product will recharge. If the amp rating of the charger is too low, the product may recharge slowly or not at all. Refer to the specifications indicated on the product or within it's owner's guide on for details.
Some products require minimum of 1 amp of current in order to recharge. Many USB ports on a computers can only provide a maximum of 0.5 amps of current. Be sure to use a safety-agency-approved power supply that meets local regulatory requirements (e.g. UL, CSA, VDE, CCC).
Try a different charger.
Charge times can vary based on the charger. Chargers with a higher current rating generally charge products faster than those with a lower rating. Chargers typically list a current rating on the label in amps (A) or milliamps (mA). A current rating of 1 A / 1000 mA or higher is recommended.


